Tuesday, April 17, 2012

Welcoming Baby Ruby...

One of my oldest and dearest friends is due with her first child in June. Heather and I have known each other since kindergarden so I couldn't be happier for her and her husband Blair.  This past weekend, three of my girlfriends and I threw a baby shower for them and we had so much fun putting it all together that I just had to put up a post about it.  It was a blast collaborating with them on this party and we were all so happy with the way it turned out.  The Southern theme was darling (a nod back to Heather's Oklahoma roots) and every detail, from the colored pom poms to the dessert bar, came together perfectly!

These pom poms were super easy to make and looked great over the dessert bar. You can find a tutorial here: Casa Sugar

For desserts, we had a sweet potato pie & a pecan pie (from the Lee Brothers Southern Cookbook) plus a buttermilk pie (a family recipe) and red velvet cupcakes.


The slow cooker pulled pork samis went great with the mint julips (also from the Lee Brother's Southern Cookbook).

What's more southern than deviled eggs, pimento cheese spread and cucumber finger sandwiches? Yum!

For beverages, we had flavored lemonades (strawberry, ginger and mint) as well as delicious homeade mint julips.

The paper yellow striped paper straws and pink polka dot cupcake liners came from Sur La Table.

Party favors were homeade cookies tucked in these darling gift bags.


Kim put together a darling "onesie station" where we all made custom onesies for Heather to take home. The pre-cut fabric scraps (in lots of fun shapes and colors!) adhered easily with fabric glue.  Baby Ruby is going to be one stylish kid. :)

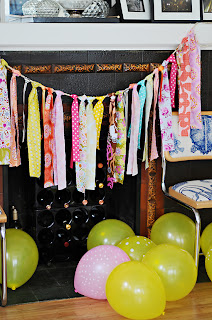
With the left over fabric, Kim created this darling banner to hang on the mantle.

Here's the soon-to-be parents opening gifts. :)

Heatehr (center) pictured here with the hosts of the party (left to right) - Nikki J, Nikki T, Kim and me!

Friday, April 6, 2012

A Simple Fix

Bedside table lamps frustrate me. The ones I tend to like are always ridiculously overpriced and those in my budget seem to be just plain ugly.  I also to change up our bedroom often enough that I don't really feel like spending so much money on something that I might want to toss in the near future.  So when in doubt (and on a budget), I DIY.  :) I knew I wanted something between modern and shabby chic and searched high and low for something I could transform into exactly what I was envisioning. I finally had some luck at the Alameda Antiques Fair, an amazing once-a-week flea market in the East Bay that is full of treasures galore.  After considering several old lamps (and passing most of them up due to faulty aged wiring that would require some cash to fix), I stumbled upon a perfect pair iron candle sticks for $5.  They were hollow on the inside so I was able to easily run some wiring (which I had from our old lamps) through them.  I used black chalk board paint, which I already had, for the bases as I wanted a nice flat look. For the lamps shades (which were also left over from before), I found a few yards of scrap fabric at my favorite upholstery store (Satin Moon on Clement Street) for $15 and even had a little left over to make a few pillows.  All in all, the total cost to redo these 2 lamps was $20!  Totally worth it and I am so happy with how they turned out.


Friday, February 10, 2012

Love is sweet...

I love Valentine's Day. I don't love the crowds at the restaurants or the over priced expected gifts that go along with it, but I do love the romantic notions behind this holiday. Maybe it's because Dave and I got engaged on Valentine's Day but whatever the reason, this day makes me happy.  Every year at this time, I am reminded of the sweet little paper valentines traded as children and also the yummy candy that always accompanied them.  And no matter how may years pass, I never get sick of the old traditional valentine's heart candy, lightly sweet and inscribed with messages of affection - "forever yours", "love u" and "kiss me" to name a few.  Although I have to admit that some of the current messages do make me feel old.  When did "text me" and "tweet me" become romantic conversation? Oh well, I still love them.  And of course, since this is a holiday, I had to make a wreath and these little candies made for the perfect adornment. :)

I started with a flat foam wreath and some pink construction paper. I cut the paper slightly larger than the wreath so that I would have good base for the candy.


Once the paper was glued on, I went to town using my hot glue gun to adhere the hearts onto the paper in several layers.


And voila!


Sunday, January 29, 2012

Cookie swap + a sweet take away...

I'll take any excuse to throw a party.  If you know me well, you know how much I love to entertain. I think it's a combination of being my mother's daughter (her holiday dessert party has made her a legend on the West Coast of Florida) and also the fact that I just love entertaining people in our home. Something about sharing a good meal, some good wine and good company is one of those things that makes a house feel like a home.

So this month, when three of my girlfriends all had birthdays, I put together a cookie swap so all of the ladies could get together and celebrate (and who doesn't need more cookies after the holidays, right?).  Now the cookie swap I can't take credit for - this awesome tradition was started by our friend Kate few years back and when she and her family moved to Portland last August, it left a huge void in our group of friends here in SF.  So in honor of Kate, we decided to keep the cookie party alive and hold it in honor of our January birthday gals (in the past it's been a holiday cookie swap in December).  Kate was of course missed but we did manage to get her on the phone with us for part of the party.  All around a good time and everyone left with full bellies and lots of treats to take home, including some homemade vanilla extract.

Something else I also love about hosting a get together - the party favors!  And this particular was not only delicious, but also super easy to make.  Instead of using vanilla beans, I used Nielsen Massey Vanilla Bean Paste, which you can find at most gourmet specialty shops (I got mine at Sur La Table).  Its cold processed and is concentrated enough to make a large jar of extract (and at about $10 a bottle, it's alot less expensive than the beans!).  To make it, I just dumped the whole jar of paste into a large jug and then put in about a liter of vodka (I went for the cheap stuff since I would be cooking with it and not drinking it). I then sealed off the jar and left it to sit in a dark place for 3 months, shaking every so often to get things good and mixed up.

I wasn't quite sure how it  would compare to doing this same process with the beans but I was happy to find that it's not only delightfully fragrant but it's also delicious (none of that overly alcohol smell that extract sometimes has).  I used a few teaspoons (yes, I kept one of the party favors for myself! :) to make some lemon buttermilk cookies and it worked beautifully!  For the packaging, I found the darling labels here and used small glass jars with the tops wrapped in washi tape, just to make them a bit more colorful.  I plan on  making another batch of the extract soon but next time I am going to try it with bourbon...um, yum!  :)


Thursday, January 26, 2012

New dining room chairs! Well, sorta new....

I think I was a dumpster diver in a former life. Ok, so that's kind of gross...let me rephrase. I think I was probably a flea market addict, a bargain hunter, an antique collector...you get the idea.  But really, if you ask my husband, I have been known to bring home objects that some might consider garbage.  Take my new (well, repurposed) dining room chairs.  On our way home a few weeks ago, I saw these beauties sitting on the side of the road near our apartment. Dave, of course, thought I was insane for wanting to drag them inside, but I saw something special in them beyond their ugly 1960s chipped cream paint and ripped green laminate seat exterior. Nothing that a little paint and fabric can't fix, eh? And luckily I was right - several coats of black paint and some updated colorful upholstery later, we had four new dining room chairs. The painting process did take a few days (between stripping them down, painting on the primer and several coats of black paint), however, the seat recovering only took about an hour.  All in all the extra labor was totally worth the result. :)

This is what they looked like before...


Seat cushions removed...


Stripped and primed...


I cut the fabric a few inches wider than the seat cushion all the way around and then staple gunned each side once to start.


Once I got all four sides nailed down, I went all the way around with staples while pulling the fabric tight.  Then, for the corners, I folded the fabric in (nicely like a present :) and stapled those down as well.


And voila!


These are the chairs post 3 coats of black paint...


And here they are with the cushions put back in...


So pretty!!! :